Showing posts with label Crafts/DIY. Show all posts

Sunday, September 29, 2013

Halloween Cards

 I just stocked up the shop with some new cards for Halloween!
Perfect for kiddos, friends, parents, siblings, co-workers, & well, just about everyone!

(I mean, really, who doesn't love getting a little snail mail??)

Take a second to check out the new designs over here!

Cheers,
-N

Thursday, September 19, 2013

It's Open!

Finally! 
After a summer full of hard work & preparations, I have opened (the virtual doors) of my Etsy shop!

I am so excited to be able to share my creations with you all!
Here's a sample:
Take a look for yourselves, and let me know what you think
(Seriously, I'd love to hear your feedback!)

Cheers,
-N

Tuesday, July 9, 2013

It's Happening!!

You guys, I am working on opening my Etsy shop - FOR REAL!
I know it's been a bit of a mystery, but I have been working much more seriously toward it as of late, and I am so excited to start selling my creations very soon!

Here's a little teaser & view of my current work station (aka our dining room table, haha)
 
 I have Pandora radio on high, I'm brainstorming, and researching, and carving, and eating.
But not all at once of course.
And now I'm rambling.

 Which means it's probably time for me to get back to the drawing board/table.
(Also, Dave, if you're reading - we'll be eating dinner on the couch again )

So, what do y'all think I'm making over here?!
-N
 

Sunday, April 28, 2013

Mother's Day Gift Ideas

Mother's Day is just a few weeks away and instead of procrastinating and crafting something out of popsicle sticks, I figured I'd share some gift ideas for the moms in your life!

 (1 | 2 | 3 | 4)

Now, if your mama is anything like mine she loves flowers, and gardens, and nature, well, you get it. So, if you're noticing a theme to my gifts here, it's because I was inspired by a nature/garden theme.

You might think the first item is just a card. But it is so much more. It actually has rannaculus seeds in it (one of my favorite flowers) so you can plant it after you've enjoyed it and it will grow flowers!
How stinkin' cool is that??
It's also made by my favorite card shop - and one of my biggest inspirations - so that's pretty cool, too.

Then you have a bundle of flowers.
Kids, guys, friends, sibling, aliens... never underestimate the impact a beautiful bunch of flowers can make! I'm not talking about the $75 dozen roses (that die the next day) but instead a thoughtful bunch or your mom's favorites. And yes, they can even be picked right from a garden! (Since it does have so much less of an environmental impact! But of course if it's her garden, you might want to ask first.)

The third item I chose is listed as wedding jewelry, but I think it is just stunning for any occasion.
Every woman needs a great statement piece, and is this timeless or what?
Also, the tangle-esque details reminded me of vines and the pearls of sweet little buds.
(Sticking with the theme here.)

Lastly, some darling herb labels. Minimal with a pop of color - you can't go wrong.

How are you celebrating your mom this year?
-N

Friday, March 29, 2013

Tie-Dyed Easter Eggs

I discovered this method of dying Easter eggs awhile ago, but it wasn't until last year that I was able to try it. Due to scheduling conflicts Dave and I weren't able to spend Easter with his family, and for the first time as a couple, we were spending a holiday just the two of us. So, we decided to embraced making some of our own traditions. 

I asked if we could try this - since dying Easter eggs in some form is a must - and he excitingly agreed! We ran around to some of our favorite thrift stores and found some pretty awesome ties. 

We has so much fun doing this last year, that we officially made it an Easter tradition!

What you'll need:
100% Silk Ties (the crazier the pattern, the better! ....At least I think so)
An old white t-shirt, sheet, or pillow case
Scissors
Rubber bands or twist ties
1 Large pot
3 Tablespoons white vinegar
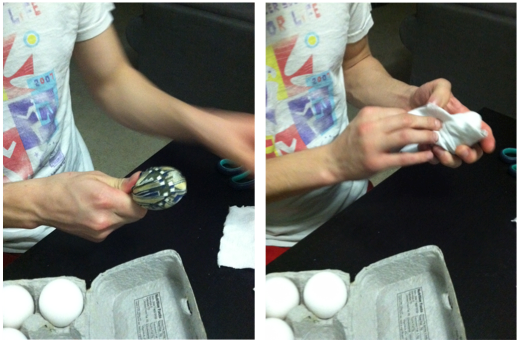
 Start by cutting the seam of each, and "gutting"them, leaving just the silk casing.
 Then, cut each tie into square(ish) pieces, large enough to wrap around an egg.
Cut similar sized squares from your old t-shirt or sheet.

Now you're ready to get to work.
First, wrap the egg in the silk cutting, with the design/printed side facing the egg.
Then, wrap the white fabric around that and use a rubber band to secure.

Place the wrapped eggs in your pot and fill it with water, covering all the of eggs & add the 3tbsp of vinegar. Bring the water to a boil & then turn it down to a simmer for 20 minutes.

Scoop out your eggs, let them cool, and unwrap to discover the awesomeness!


We love the fact that this is a mess free, odor free (Dave doesn't like the smell of vinegar), surprising craft. It's always neat to unwrap the eggs and see what mark has been made by the tie. 

Also, it would be super fun to get some friends together (kids, too!) and have everyone bring a tie and do this in a group. It would lower the cost and up the fun for sure!

Happy Decorating!
-N

Thursday, March 28, 2013

Sneak Peek: Easter Tradition

Dave and I went to a couple of thrift stores today and found these wonderful (& hideous) ties!
What do all of these (& a white t-shirt) have to do with Easter, you ask? 
Will I be making Dave wear all of them to church on Sunday? (No, but that would be hilarious!)

We will be dying our Easter eggs with this beauts and I'm super excited to share it with y'all.
I'll post a "how-to" tomorrow with all the details!

Until then,
-N

P.S. Don't forget to follow my blog with Bloglovin !

Monday, January 21, 2013

New Craft

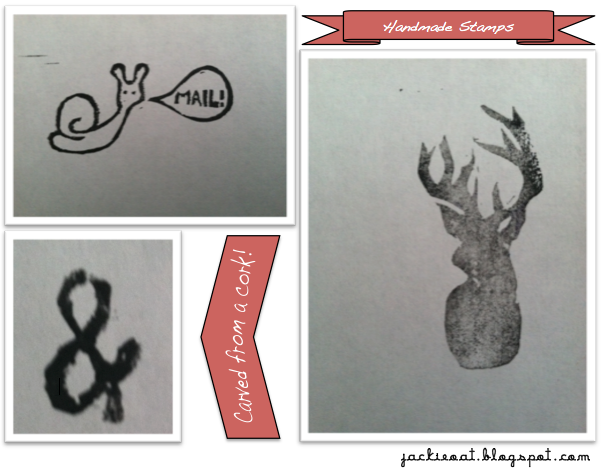
I've had a craving to carve my own stamps for quite sometime now, and since Christmas brought me craft store gift cards & some spare time, I am happy to say that I've been able to dive right into this new craft! 

A few posts ago I showed y'all a photo of my first stamp, a paper airplane, and now I have some more goodies for you.
To make these stamps I used a Speedball Carving tool (which can be found online or at any art supply), & a few X-acto knives. I carved onto Speedy Carve (rubber) & old corks.

I've sort of become addicted to making stamps, and I'm pretty happy about it.

I have yet to figure out what to mount the actual stamps to yet, but I'm sure it'll come to me.

Feel free to leave some ideas below, too!
-N

P.S. If you'd like a custom stamp, shoot me an email or leave a comment below. I'd love to start sharing my fun new hobby with you!

Saturday, January 19, 2013

A nanny & an educator, all in one!

Sorry, that loud noise was me tooting my own horn.
(I kid.)

Anyway, I spent this past week with two sick kiddos and a lot of time to fill with activities that would be stimulating for them, and allow me a few moments to recharge.

I found a set of wooden letters amongst the copious amounts of toys and decided to have the 4yr old find the letters to spell some basic 3 letter words.
This activity helped with his letter recognition, spelling, & reading, and took all of 2 minutes to set up.

Oh, and it kept him busy for about 30 minutes

Then, for the little guy (18months), I created a simple "toy" to help his fine motor skills further develop. I think I had seen something on Pinterest with pipe cleaners and color matching, but since they didn't have pipe cleaners (and the skills to really match colors, yet) I adapted the idea.
I took an old bread crumbs container, poked a few holes in the lid and grabbed a handful of un-sharpened pencils and Q-tips.

I started him with the pencils, since they are larger and easier to hold and then added in a few Q-tips as we went along. 

To say he LOVED this activity would be an understatement. It was a HUGE success with him and he just kept wanting me to open the lid, dump out the supplies, and let him "play" again. He would smile and giggle every time. It was pretty adorable.

Here's to keeping the kiddos engaged!
-N

Tuesday, January 15, 2013

Recipe Cards

For over two years I've been wanting to make recipe cards 
and get my meal planning off of my phone and into the kitchen. 
(Seems more appropriate, doesn't it?)

I kept telling myself to wait until I got a handy program like Photoshop or Corel Painter, because it'd be easier and better looking.
Well, I got one of those handy programs last week, and guess where I made these recipe cards this afternoon. . .
 
. . .MS Word. True Story.
"Why?", you ask

Well, it's a lot harder to learn Corel Painter than I thought it would. 
Lame, I know, but I'm just so comfortable with my old ways. 
(Which leads me to my next project)
Learn Corel Painter
If any of you have tips/tricks please share!
(Or if you can just run a class and let me attend -fo free- that'd be great, too ツ)
 
 What do you guys do as far as recipe cards/meal planning/eating, ha!
I'd love to hear,
-N

Thursday, January 10, 2013

...and we're back!

From where you ask? 

Well, this past month Dave and I have been on what I like to call "visit-the-family-for Christmas/Birthday/Winter-vacation". Basically what that means is that we drive from Pittsburgh, pit stop in Philly (to catch up with some wonderful friends! & celebrate Harry Potter themed Christmas, of course). Continue on to New Jersey for a week to visit with my in-laws, whom I truly love spending time with (especially since I have no siblings of my own, sad face.) Then move on to Long Island to see my family and celebrate my birthday. Whew. 

During this time, despite the fact that we both took our electronic devices with us, we were pretty disconnected from the internet world.

It was rather refreshing.

Then, as if spending three weeks away from home (and internet) wasn't exciting enough, after our long drive back from Long Island to Pittsburgh, we went with four other couples to a cabin in the mountains not far from Pittsburgh.

We went hiking, played games, watched movies,
All the good stuff!
  
Here are some visual stimuli in the event you didn't soldier through all those words
(no hard feelings)

That being said, I'm back and here to stay.
I am going to be taking this blog more seriously from now on, as well as doing some other new and exciting things (see below!)

See you soon!
-N

Sunday, December 9, 2012

Photo Props

Last night we went to a Christmas party and in addition to bringing a string bean side, I thought I'd toss in a photo booth with some props as well!

I saw a photo on Pinterest of some Christmas themed cut-outs awhile back and today I decided to make some of my own (instead of cleaning. It was a good decision.)

I used:
Cardstock
Wooden Kabob sticks
Duck tape
(all of which I had lying around, so this was a free DIY!)

It was super fun to make these and it seemed like everyone really enjoyed using them!

Here are some of the results:

The general consensus is that I should save these and each year make some new props.
So far we've decided to add:
Mrs. Claus' bonnet-esque hat & spectacles
More elves
The Grinch
& Some Who's

Anyone else have any suggestions??

Go be silly today!
-N

Saturday, December 1, 2012

Life as a nanny...

I'm currently working as a nanny for two boys (aged 1.5 & 4). They have so much energy that often times I need to make sure I have activities planned for them to keep them engaged and to keep me from running around (and playing make believe) for hours on end. (I mean it's great for an hour or so but you can only be a pirate for so long, ya know?)

Anyways, I recently set up somewhat of an obstacle course for the oldest and it was such a success (for him, and me!) that I had to share. 


The first obstacle was something I think I stole from Pinterest (does anybody else confuse things they thought of with Pinterest ideas? Addicted much?)

Well it's a simple "laser beam" obstacle of course! (but really it's just ribbon and tape.)
It was so fun to watch him slither under & hop over the "lasers". I even made him restart if he touched one.
 No short-cuts here!

#2 Bowling made from blocks, a ball, & a wooden spoon to mark where to stand (...naturally...)

#3 Hopscotch - Pillow Edition

#4 Counting Army Men (the teacher in me is starting to show)
I drew a few squares & wrote numbers above them so he could place the correct amount of Army Men in them. I even had him add(/count) them all together at the end as a "special challenge".

#5 Practicing writing on a magnetic board (do they have a special name? I can't remember.) Anyway, I had him write his name, his brothers name, and Mom & Dad. 


Isn't his writing nice for a (young) 4yr old?

This ended up keeping him busy for at least a half hour (he wanted to do it a couple of times) and it was literally free to create (make use of what you've got!) and super simple to set-up.

I highly recommend creating structured activities - especially for stay at home moms - (which is what I feel like sometimes, ha!) It helps the kids stay actively engaged and keeps you from running around like a mad-women (or a pirate...)

Have fun playing!
-N

Sunday, November 18, 2012

'Tis the Season!

... well, almost.

Although I am a strong believer in waiting to celebrate Christmas until after Thanksgiving (since it's a very sweet holiday that shouldn't go unnoticed), I started making my Christmas cards today in an effort to get a head start before we take a holiday in Aruba this week.

I've always enjoyed making cards, and despite my sad iPhone camera photos, I think they turned out well.


What do you think?
Would you buy any of these?
- Be honest -

They're all hand crafted and for family and friends this season, but I had such fun listening to the Florence and the Machines Pandora station and crafting away that I might just keep making them!

 (Ignoring the fact that this post was Christmas related...) 
Have a Happy Thanksgiving y'all!
-N

Saturday, November 3, 2012

A new twist on an old Jack o' Lantern

Pumpkin Carving is something that has been a pretty serious business throughout my life. 
Growing up, my mom and I took pride in carving intricate designs into our pumpkins and every year I try to do something that was important to me that year.

A couple of years ago when a favorite story of mine, Where the Wild Things Are, became a movie, I carved this:


 And this year I felt inspired to carve a bridge in honor of being a new resident in Pittsburgh - the city of bridges!

 The process is pretty simple. I start with a photo I like, sketch it out on the gourd, and get carving!
Some of the tools you see are part of a very inexpensive pumpkin carving set from my local grocery store. Over the years they have held up very well and proven to be the best tools I have for carving.

 This is my favorite shot of the pumpkin
 At this angle, my husband says it looks like a tiara (I can't say I disagree) but I am fairly pleased with how it turned out.

This is a Halloween tradition I truly cherish.
 What do you do each year for Halloween?

Please share some thoughts below & to everyone around the East Coast whose festivities were postponed due to Sandy, safely enjoy your Halloween fun this weekend!

-N


Thursday, September 20, 2012

DIY Recycling Bin

I apologize for my lack of posting lately. I was sick just about all of last week, and then had to try and make up for all that lost time this week, so now I'm finally caught up on just about everything.

Here's a quick DIY that everyone should do because recycling is a super simple way to help lessen our impact on the environment. (Minor environmentalist rant complete).

What you'll need:
An old cardboard box (we clearly had a ton from moving)
2 Rolls of Duct tape
Scissors (if you're particular like me)
Paper & Pen (for a label)
Oh, and a shelf/place to put it ツ      
__________________________________
Total  Cost: About $5

Using duct tape is a great way to make the box last and keep away any leaks or pesty bugs.

I actually had a blast being all OCD while sitting in front of my TV and watching an episode of Law & Order.

Enjoy creating yours!
-N

Saturday, August 25, 2012

DIY Wall Art

Here's a simple DIY that I just made a few hours ago:

First, grab a medium-sized wood panel or small pallet
This one here is from IKEA - my all time favorite store.
 It came from their clearance room and cost me $1
(Needless to say, you can find pretty great things there!)

Then, grab some post-it letters and a favorite quote:
Since they only stick on the top, you'll also need some rubber cement glue (the most magical glue, in my opinion), so the paint doesn't creep under the letters.
Next, glue down your letters quickly as not to let the rubber cement dry too long.

After you have your words glued in place, grab some paint and a sponge brush and get to work. I recommend putting the paint directly on the sponge brush first, and twisting it around to even out the amount of paint on it.


Finally, after waiting a bit to let the paint dry, peel off the letters and touch-up the corners or sides that may have gotten paint under them. 
Nail polish remover on a Q-tip works very well.

Now find a home for it and enjoy!

Happy Painting,
-N

Thursday, August 23, 2012

DIY "Cork" Board

Here's a simple, chic, and eco-friendly DIY to help you get a bit more organized.

Grab some old corks (corks are one of those things I always save!)

Line them up in a way you like best (I had some repeat corks, so I made sure to separate them... sorry, that was my OCD talking.) Then hot glue them one at a time. Be sure to line them up against something so they don't roll away as you're trying to glue them together.


Finally, mount it to your wall/doorway where you will notice it. I actually asked my husband where he would take notice of it most, and I put it there. (Love notes and "to do lists" are vital to any marriage hehe)


By the way, this project took me less than 10 minutes.

P.S. You can always add corks as you go along. I only had so many, but you can bet this baby will grow with every cork that crosses my path!

Happy Crafting!
-N


Saturday, August 18, 2012

Tea Canister Upcycle

Upcycling items is one of my favorite things to do. I like to save random items here and there because I know that I'll come up with a use for them now or later. This craft is actually about two things that I was able to "upcycle" (or "repurpose", if you prefer). And unlike most things I've saved, this one didn't sit in my craft pile very long, it had it's revival nearly immediately! 

(On a side note, I my idea of saving things for future uses does not include hoarding in any way, shape, or form. It's all neatly organized into a small craft bin, of course!)
 (On another side note, hoarding is extremely heart breaking and I am really great at getting rid of things that are no longer useful/needed - so if you ever need an organizing buddy/encourager, I may be your gal!)

That being said, grab an old ice tea or lemonade container, some random crafting supplies, and get to work!

My crafting supplies included everything you see here (old tissue boxes are great as scrapbooking paper, too!), plus some markers and mod podge.

And here's how it turned out!

Happy Crafting!
-N


Thursday, July 12, 2012

Pen Pals

This summer my dear friend Kate (who I've mentioned before) is working with a church in order to help strengthen their youth ministry. She is just the girl for the job and I know that God has called her there for a reason, but that also means that she had to move a little over an hour away and live in the community in which she is working. Since she is living quite a distance and working very often (either hanging out with students, or planning events in her awesome office,) we don't have many opportunities to get together or share what is going on in our lives.

Thankfully, Kate has just enough time to be my pen pal for the summer and it's definitely one of the greatest things I ever been a part of. (No, I don't mean world-changing, earth-shattering greatness, just personal greatness... or secret awesomeness as Bob Goff would put it.)

Having a pen pal has really helped me grow in several areas:

1) It keeps me accountable about starting something a sticking with it. (I mean, if she wrote to me, and I never responded, that'd be pretty lame.)

2) It helps strengthen our friendship and allows us the opportunity to share in each others joys and struggles. It's helped make me a better friend, for sure.

3) It gives us the chance to pray for each other and not only get closer to God, but also help develop compassion and thoughtfulness within ourselves.

4) It encourages me to be open and honest about my strengths and weaknesses.

5) It gives me something to look forward to. Whether it's a bad day, or just a boring day, knowing I have a letter coming soon with the experiences, thoughts, and prayers of someone I love is exciting! Plus, it's great to get mail that isn't a bill or an unwanted catalog.

6) It gives me the chance to reflect on my week(s) and appreciate all of the things I was able to do.

7) It's a great way to get creative and have some fun - take a look at some of our beautiful correspondences:

If you've read through all that, then you've pasted the first test - you're ready to be a pen pal! 
(Just kidding, none of our letter are actually that long.)

Anyways, I encourage you to find someone, near or far, and start writing!
-N

Monday, July 9, 2012

Moving Announcements

I've been wanting to order "moving announcement" cards for weeks now, but I just couldn't bring myself to spend the $40+ dollars they would cost. I had found some really cute options on Shutterfly which is a great site for photo albums, cards, etc. but for something as small as moving, I just couldn't bring myself to do it. I still wanted to figure something out though, because I love the function they serve of just getting your new address to everyone, minus the overwhelming amount of phone calls or text messages. 

Well, as I was avoiding packing yesterday, I decided to try making my own. 
Here are the two that inspired me:


And here is what I managed to throw together in about an hour:


 Keep in mind, I had big dreams for these little cards, and I do not have any fancy programs - just the good old Microsoft Paint. Well, that and my all time favorite font site. (Seriously, I use it all the time and the fonts are FREE!)


I printed them on white card stock which I had lying around, and I am really happy with how they turned out. In fact, I love them even more than the two that I found online. Oh, and did I mention that the cost of these beauties would only be about $3 if you had to buy your own card stock? Yup.

Wishing I could have graduated with a degree in Graphic Design and Elementary Education...
-N